You’ve seen in our other guides that there are multiple ways to measure performance in the Prescient dashboard. Using the Optimizer is the best route for tracking if you took most of its recommendations for your campaigns and now want to see the impact on revenue and ROAS. If you’re still unsure about the suitable method, your Customer Success manager can help guide you. Otherwise, you’ll want to use this guide to leverage the Optimizer to track scenarios effectively.
Key highlights
- Goal: Track the impact on revenue and ROAS of campaigns you changed based on Optimizer recommendations.
- Set up: Baseline your paid performance; know what the Optimizer predicted would happen.
- Commit: We recommend tracking the impact of changes over a 14-28 day window.
The major goal: Discover what happened after methodically applying the Optimizer’s recommendations so that you can inform the next steps and potentially run another scenario to test for further efficiency.
How to track a scenario using the Optimizer
We’ll cover each of these steps further below, but this is the process you’ll follow:
- Set up your scenario in the Optimizer
- Review recommendations from the Optimizer
- Apply changes based on the Optimizer recommendations
- Check whether you hit the budget recommendations
- Check what happened against the predictions
- Validate your ROAS and/or revenue
Set up your scenario
When you log in, navigate to the Optimization tab of the platform and hit the “Create New Optimization” button. Set up your scenario by selecting your budget, time frame, and relevant campaigns. Once you hit the button to start your optimization, you’ll get recommendations from the Optimizer based on your goals and inputs.
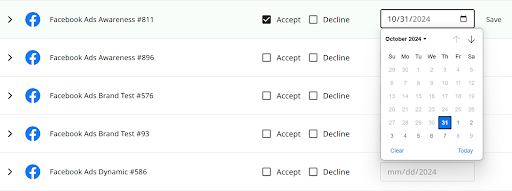
After receiving these recommendations, you’ll choose which to apply and which to disregard by accepting or declining the recommendations. You may choose to decline a specific recommendation because you feel there’s too small of an audience, a lack of impression share, or not enough data to move forward confidently with a decision on that specific point.

Once you accept or reject the Optimizer recommendations, make your budgets shift as needed and ensure your team knows which have been applied and the predicted outcomes. Allow your new scenario enough time to run to collect adequate performance data.
Analyze the impact of these changes
You need to establish what was expected to change, what was predicted to happen, and what actually happened so you can compare them after the test period. Once you’ve pulled together all of that information, you can analyze this scenario’s performance and prepare any needed reporting.
Rinse and repeat
After you measure the impact of the changes (above), we recommend refining new scenarios based on what you learned and continue running and rerunning scenarios. Your first several scenarios may be similar to see if revenue can be pushed higher since we suggest that clients start conservatively.
Changes can happen quickly: one Prescient client saw $82K more revenue from a 14-day optimization.
Best practices: Only scenarios with approved campaign recommendations will show up with the “Tracking” label in the scenario list. If you’re unsure about the steps involved, work with your Customer Success manager on the first one.
Timeline: Commit to a testing period of at least 14-28 days before tracking performance in the Optimizer. We strongly suggest a full month to gauge the impact.
Using Optimizer tracking
Friendly reminder that it is best to let the scenario fully run its course (e.g. 14 or 28 days) before making campaign decisions. If you must look while it is in flight, be mindful of how much time is left. Once that time passes, here’s how you can visualize the impact in the Prescient platform:
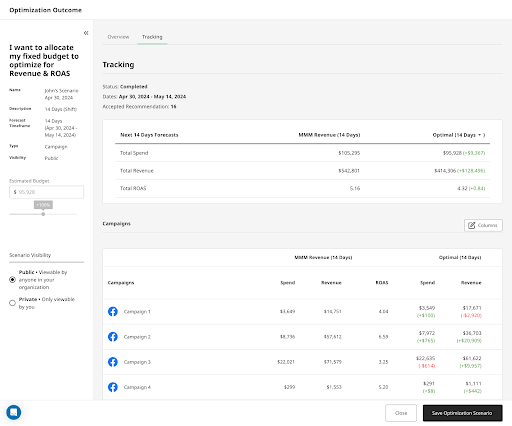
Below, we’re looking at a client who chose to change specific campaigns based on recommendations from the Optimizer. So even though we’re still using the Optimizer’s tracking function, you’ll see it called Optimization Outcome.
To get to this tool, you’ll navigate to the Optimization section in the main navigation at the very top of the platform. If you’ve set up multiple scenarios, you’ll select the one you want to look at from the full list.

Once you’ve clicked into your scenario, you’ll see multiple ways to compare the expected outcomes with your actual performance. Above, you can see that we’re looking at the campaign drill down for this client’s scenario.
You can see that in this scenario, the budget was a bit over by 10% but hit the predicted ROAS target. That’s a great result!
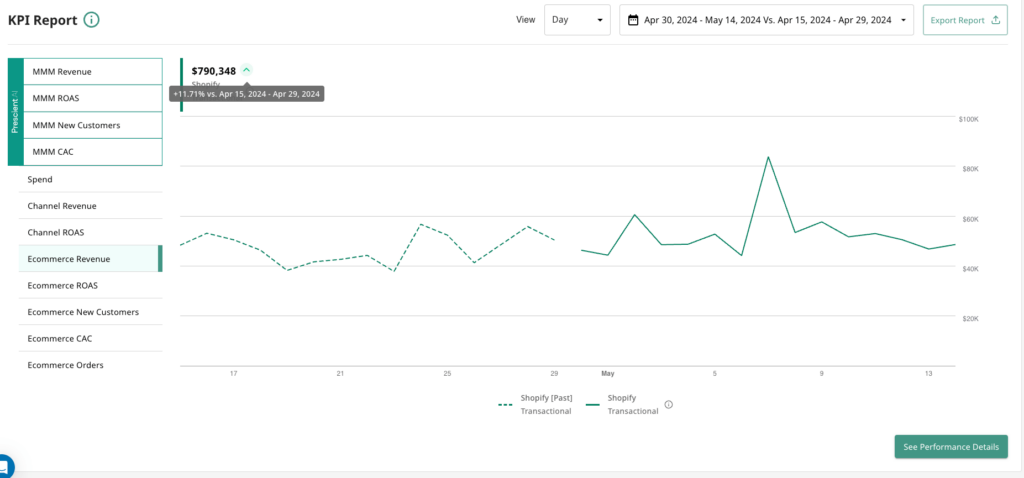
The third and final step is to validate whether or not you observed an increase to your overall Shopify/Ecomm reported ROAS. This is by far the most important step to pressure testing the model and instilling trust.

Why you should try it
The tracking function in the Optimizer is a great choice for teams that apply most of the tool’s recommendations. You can see how each of your campaigns pace against predicted outcomes in three critical buckets: budget, ROAS, and revenue. Talk with your Customer Success manager if you’d like to walk through setting up and tracking a scenario together. We suggest that Prescient clients start conservatively, aiming to increase revenue through acting on Optimizer recommendations by 3% in 28 days.


